Microsoft Azure Service Bus supports two distinct messaging patterns: Azure Relay and Service Bus Brokered Messaging. This article is an introduction to Brokered Messaging.
Brokered Messaging can decouple the communication between applications by introducing an asynchronous messaging system. The sender applications put the requests on a queue and the receivers will pick them up and process them whenever they are available. This way if the receiver application is temporarily busy or unavailable the sender application doesn’t fail or get blocked.
Queues
A queue is an entity with a head and a tail. Senders put the messages on the head and receivers pick them up from the tail.

Once a message is processed by a receiver it will no longer be available on the queue for other receivers. When there are multiple message receivers, the message load is distributed between them in a load balancing manner.
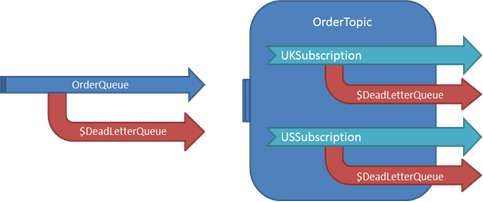
Topics and Subscriptions
Topics and Subscriptions can be thought as queues with one head but multiple tails. The head is called a Topic and each tail is called a Subscription. When a sender sends a message to a Topic, Service Bus creates multiple copies of it for each subscription. If there are several receivers interested in receiving the message, they can each listen on a different subscription and get a distinct copy of the message. However, if they listen on the same subscription, only one of them will be able to receive the message.
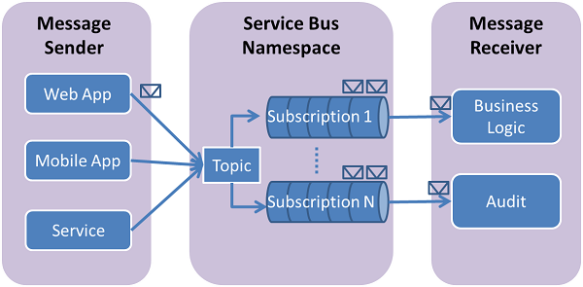
The Subscriptions can specify filters. This way each subscription only exposes the messages that match its filter.
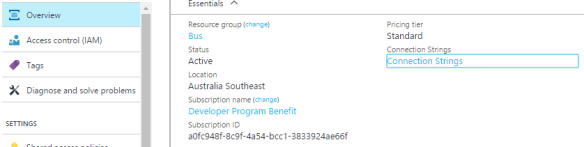
Service Bus Namespace
A namespace is the way to categorize the queues and topics. You cannot create any service bus entities unless you have created a namespace first. A company may want to have different namespaces for different projects or teams. Creating a namespace is easy, you just need to go to Azure portal and follow the instructions. After the namespace is created it can be referred to, using its connection strings.
Creating Service Bus entities (Queues, Topics and Subscriptions) is also as easy as creating a Namespace. Just follow the instructions on Azure portal.
You can also manage Service Bus entities programmatically using the NamespaceManager class.
Client API
In your project install WindowsAzure.ServiceBus Nuget package to get the Service Bus client library. Here are a few code snippets to get the basic things done:
Basic Queues operations
// Creating a Queue client
var client = QueueClient.CreateFromConnectionString(connectionString, queueName);

// Creating a message
var message = new BrokeredMessage("Hello");

// Sending a message
client.Send(message)

// Receiving a message
client.OnMessage(message =>
{
    // Processing the message here...
});
Basic Topics operations
// Creating a Topic client
var topicClient = TopicClient.CreateFromConnectionString(connectionString, topicName);

// Sending a message
topicClient.Send(message)

// Create a Subscription client
var subscriptionClient = SubscriptionClient.CreateFromConnectionString(connectionString, topicName, subscriptionName);

// Receiving a message
subscriptionClient.OnMessage(message =>
{
    // Processing the message here...
});
Messaging Factory
Another way of creating messaging clients (QueueClient, TopicClient or SubscriptionClient) is using a MessagingFactory. It allows us to create the clients in a more abstracted way and thinking of them as senders and receivers. It is more flexible and makes it easier to change the messaging strategy without having to update the code. For example, if your application is currently using Queues and you decide to switch to Topics/Subscriptions, all you need to do is updating your endpoints if you have used messaging factory to create the clients.
var factory = MessagingFactory.CreateFromConnectionString(ConnectionString);

var messageReceiver = factory.CreateMessageReceiver("entityPath");

var messageSender= factory.CreateMessageSender("entityPath");
Message Lifetime
When a message receiver is created it specifies a Receive Mode. There are two receive modes:
- Receive and Delete: In this mode as soon as the receiver picks up the message, the message gets deleted from the queue. If the receiver crashes before being able to process the message, it will be lost. This At-Most-Once delivery is guaranteed.
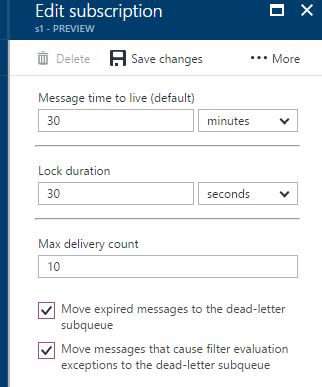
- PeekLock: This is the default mode and guarantees At-Least-Once delivery. When the receiver picks up the message in this mode, the service bus puts a lock on the message and hides it from other receivers, but the message still exists on the queue until one of the client completes processing the message. If the client crashes before that, the message will be visible on the queue again after the lock expires. The default lock duration is 30 seconds and it can be set on the receiver (queue/subscription).
After the message receiver is done with the message, it should notify the service bus by calling one of the following methods:
- Complete(): The message was successfully processed and it should be deleted from the queue.
- Abandon(): The receiver doesn’t know how to process the message and it returns the message to the queue to make it available for other receivers.
- Differ(): The receiver doesn’t want to process the message just yet, so the message will be returned to the queue but it will not be delivered to any receiver unless they explicitly request for it by its sequence number.
- DeadLetter(): The receiver has encountered an error processing the message and marks it as a dead-letter. Dead-letters are sent to a sub-queue within the same queue.
The following code shows how to read a message from the dead-letter queue:
var factory = MessagingFactory.CreateFromConnectionString(ConnectionString);
var deadletter SubscriptionClient.FormatDeadLetterPath(TopicName, SubscriptionName);
var deadletterClient = factory.CreateMessageReceiver(deadletter);
deadletterClient.OnMessage(message =>
{
    // Process dead-letter message here
});
A queue or subscription can be configured to move expired or erroneous messages to a dead-letter queue too.
The OnMessage method automatically marks any received messages completed. If the client is going to take care if this itself, the AutoComplete should be disabled first:
messageReceiver.OnMessage(message =>
{
    try
    {
        // if message processed successfully
        message.Complete();
    }
    catch (Exception exception)
    {
       // If message has an error
        message.DeadLetter();
    }

}, new OnMessageOptions
{
    AutoComplete = false
});
The longest a message can live on a queue before it is processed is determined by its time-to-live afterwhich the message gets deleted automatically. Time-to-live can be specified on the queue, topic, subscription or the message itself. A message can only live as long as the minimum time-to-live specified on its queue, topic,
subscription or the message itself.
var message = new BrokeredMessage
{
    TimeToLive = TimeSpan.FromMinutes(10)
};
Duplicate Detection
When sending a message, if an error happens and the client cannot send the message, it usually retries sending and this may lead to having duplicate messages on the system. A client also re-sends the message if it doesn’t receive any acknowledgement from the queue. Enabling duplicate detection keeps track of the MessageId property of all messages. If a new message with identical MessageId as an existing one is detected within a time window (duplicate detection history), it will be ignored and dropped.
Duplication detection can be enabled on Queue or Topic when creating them either in the Azure portal or programmatically by setting the RequiresDuplicateDetection property. The duplicate detection history window can also be set on a Queue and Topic. In the code set DuplicateDetectionHistoryTimeWindow on a QueueDescription or TopicDescription.
The duplicate detection window should be kept as small as feasible, because large window size means keeping track of more message-Ids and it impacts the throughput.
Filters, Rules and Actions
A subscription can be created with a filter so that it delivers only a subset of messages to subscription clients. A CorrelationFilter allows for a basic filtering based on the message properties like MessageId, CorrelationId, etc.
namespaceManager.CreateSubscription(topicPath, subscriptionPath,
    new CorrelationFilter { Label = "red", CorrelationId = "high"});
You can also specify a SqlFilter which allows for Sql-like expressions:
namespaceManager.CreateSubscription(topicPath, subscriptionPath,
    new SqlFilter("color = 'blue' AND quantity = 10"));
When creating a subscription, if a filter is not explicitly specified, the subscription will be created by default with a TrueFilter which means the subscription accepts all messages.
A subscription can also be created with Rule. A rule executes an Action on the messages matching the filter.
namespaceManager.CreateSubscription(topicPath, subscriptionPath,
new RuleDescription
{
    Name = "RedRule",
    Filter = new SqlFilter("color = 'red'"),
    Action = new SqlRuleAction(
        "SET quantity = quantity / 2;" +
        "REMOVE priority;" +
        "SET sys.CorrelationId = 'low';")
});
In the above example, the rule will run a SqlAction on any messages whose ‘color’ property is ‘red’ and as a result of the action, two properties of the message will be set and one property will be removed. Read more here.
Shared Access Policies
Every messaging entity is associated with a set of access policies that determine what you can do with entity. When an entity is created it comes with a default policy named RootManageSharedAccessKey which gives you full access (Manage, Send, Receive) to the entity.

Each policy has a primary key and a secondary key both of which can be used to connect to the entity. If a key is compromised, you should regenerate it and update all clients to use the new key. The reason there two keys is that you switch to the other key before regenerating one to avoid a downtime in your system.
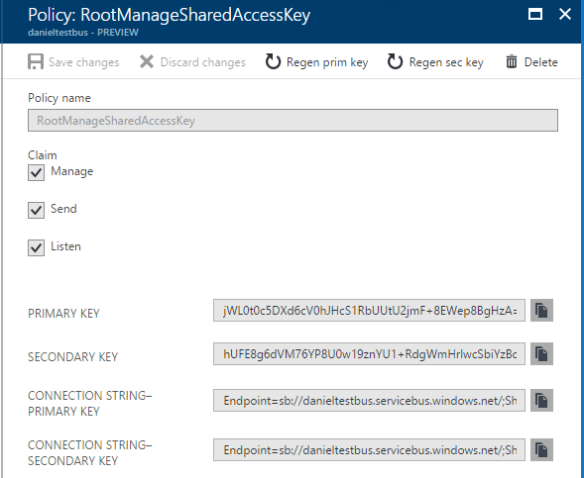
It is not recommended to use your Root manage accessed key everywhere in your system. You should create custom policies with reasonable access levels (Send, Listen or Manage) and use it in clients.
Auto-forwarding
You can use auto-forwarding to scale out an individual topic. Service Bus limits the number of subscriptions on a given topic to 2,000. You can accommodate additional subscriptions by creating second-level topics. Note that even if you are not bound by the Service Bus limitation on the number of subscriptions, adding a second level of topics can improve the overall throughput of your topic.
You can enable auto-forwarding by setting the QueueDescription.ForwardTo or SubscriptionDescription.ForwardTo properties on the source queue/subscription:
var srcSubscription = new SubscriptionDescription (srcTopic, srcSubscriptionName);
srcSubscription.ForwardTo = destTopic;
namespaceManager.CreateSubscription(srcSubscription));
The destination entity must exist at the time the source entity is created. Lear more…
References:
Microsoft Azure service bus messaging documentation
Microsoft Azure Service brokered messaging course on Pluralsight
Southworks by Jorge Rowies
Cloudcasts by Alan Smith
Github samples